Blog

  • 首页

  • 关于

  • 标签

  • 分类

  • 归档

  • 搜索

springboot-----cache

发表于 2019-08-21 更新于 2019-08-23 分类于 SpringBoot 阅读次数:
本文字数: 9k

环境搭建

依赖

1
2
3
4
5
6
7
8
9
10
11
12
13
14
15
16
17
18
19
<dependency>
<groupId>org.springframework.boot</groupId>
<artifactId>spring-boot-starter-cache</artifactId>
</dependency>
<dependency>
<groupId>org.springframework.boot</groupId>
<artifactId>spring-boot-starter-web</artifactId>
</dependency>
<dependency>
<groupId>org.mybatis.spring.boot</groupId>
<artifactId>mybatis-spring-boot-starter</artifactId>
<version>2.1.0</version>
</dependency>

<dependency>
<groupId>mysql</groupId>
<artifactId>mysql-connector-java</artifactId>
<scope>runtime</scope>
</dependency>

controller

1
2
3
4
5
6
7
8
9
10
@RestController
public class UserController {
@Autowired
private UserService userService;
@GetMapping("/user/{id}")
public User getUserById(@PathVariable("id") int id){
User user = userService.getUserById(id);
return user;
}
}

service

1
2
3
4
5
6
7
8
9
10
@Service
public class UserService {
@Autowired
private UserMapper userMapper;

public User getUserById(int id) {
User user = userMapper.getUserById(id);
return user;
}
}

mapper

1
2
3
4
5
@Mapper
public interface UserMapper {
@Select("select * from user where id = #{id}")
User getUserById(int id);
}

使用默认的cache(ConcurrentMapCache)

在启动类中添加@EnableCaching注解开启缓存

使用@Cacheable, @CacheEvict,@CachePut,@Caching等注解

@Cacheable

1
2
3
4
5
6
7
8
9
10
11
@Service
public class UserService {
@Autowired
private UserMapper userMapper;

@Cacheable(cacheNames = "user",key = "#id")
public User getUserById(int id) {
User user = userMapper.getUserById(id);
return user;
}
}
运行流程(@Cacheable):

1、方法运行前,先去查询Cache(缓存组件),CacheManager按照CacheName查找一下是否存在这个Cache,有的话就返回这个Cache,没有的话就创建一个createConcurrentMapCache.
2.根据key去Cache中查找。其中key是按照某种策略(keyGenerator)生成的,默认是方法的参数。
ConcurrentMapCacheManager

1
2
3
4
5
6
7
8
9
10
11
12
13
14
15
public class ConcurrentMapCacheManager implements CacheManager, BeanClassLoaderAware {
public Cache getCache(String name) {
Cache cache = this.cacheMap.get(name);
if (cache == null && this.dynamic) {
synchronized (this.cacheMap) {
cache = this.cacheMap.get(name);
if (cache == null) {
cache = createConcurrentMapCache(name);
this.cacheMap.put(name, cache);
}
}
}
return cache;
}
}

keyGenerator

1
2
3
4
5
6
7
protected Object generateKey(@Nullable Object result) {
if (StringUtils.hasText(this.metadata.operation.getKey())) {
EvaluationContext evaluationContext = createEvaluationContext(result);
return evaluator.key(this.metadata.operation.getKey(), this.methodCacheKey, evaluationContext);
}
return this.metadata.keyGenerator.generate(this.target, this.metadata.method, this.args);
}

SimpleKeyGenerator

1
2
3
4
5
6
7
8
9
10
11
12
public static Object generateKey(Object... params) {
if (params.length == 0) {
return SimpleKey.EMPTY;
}
if (params.length == 1) {
Object param = params[0];
if (param != null && !param.getClass().isArray()) {
return param;
}
}
return new SimpleKey(params);
}
  • 如果有没有参数的话:key=SimpleKey.EMPTY,即SimpleKey.new SimpleKey() 结果:SimpleKey[]
  • 如果有一个参数的话:key = 参数的值
  • 如果有多个参数的话:key = new SimpleKey(params) 结果:SimpleKey[param1,param2]

3.没有查到缓存的话就调用目标方法
4.将方法的返回值存入到缓存中。

@CachePut

1
2
3
4
5
6
7
8
9
10
11
//result:返回值,@Cacheable中是不能用result的,因为在@Cacheable中key是在执行方法前就创建了。
//keyGenerator:可是使用自定义的keyGenerator来生成key,key和keyGenerator只能用其中一个
//condition:用于条件判断
//unless:当条件不满足时,才会加入到缓存中
//sync:是否异步,在@CachePut中是没有异步的
@CachePut(cacheNames = "user",key="#result.id",condition = "#id>0")
public User updateUser(int id, User user) {
userMapper.updateUser(id,user);
user.setId(id);
return user;
}
运行流程

1.先根据CacheName查找是否存在缓存,没有的话就创建一个,然后返回
2.执行方法
3.生成key,然后将返回值存入到缓存中

@CacheEvict

1
2
3
4
5
6
7
//allEntries:是否删除全部(相同cacheNames)
//beforeInvocation:是否在执行方法抢删除,即使出现了异常,也会删除
@CacheEvict(cacheNames = "user",key = "#id",beforeInvocation = true)
public int deletUser(int id){
int i = userMapper.deletUser(id);
return i;
}
运行流程

1.先根据CacheName查找是否存在缓存,没有的话就创建一个,然后返回
2.如果是beforeInvocation为true的话,就直接在缓存中删除,如果为false的话,就先执行方法,然后再删除缓存。

@Caching

1
2
3
4
5
6
7
8
9
10
11
12
13
@Cacheable(cacheNames = "userList")
public List<User> getUserListByNameAndAge(String name, int age) {
return userMapper.getUserListByNameAndAge(name,age);
}

@Caching(
evict = {@CacheEvict(cacheNames = "userList",allEntries = true)},
put = {@CachePut(cacheNames = "user",key="#result.id")}
)
public User insertUser(User user) {
userMapper.insertUser(user);
return user;
}

有时候我们既要更新,又要删除缓存的时候,比如增加了一条数据后,需要将它加入到缓存中,并且将之前的list缓存删除,此时就可以使用Caching注解。

源码分析

当开启了@EnableCaching注解后,springboot会自动装配CacheAutoConfiguration这个配置类。

1
2
3
4
5
6
7
8
9
10
11
12
13
14
15
16
17
18
19
20
21
22
23
@Configuration
@ConditionalOnClass(CacheManager.class)
@ConditionalOnBean(CacheAspectSupport.class)
@ConditionalOnMissingBean(value = CacheManager.class, name = "cacheResolver")
@EnableConfigurationProperties(CacheProperties.class)
@AutoConfigureBefore(HibernateJpaAutoConfiguration.class)
@AutoConfigureAfter({ CouchbaseAutoConfiguration.class, HazelcastAutoConfiguration.class,
RedisAutoConfiguration.class })
@Import(CacheConfigurationImportSelector.class)
public class CacheAutoConfiguration {
static class CacheConfigurationImportSelector implements ImportSelector {

@Override
public String[] selectImports(AnnotationMetadata importingClassMetadata) {
CacheType[] types = CacheType.values();
String[] imports = new String[types.length];
for (int i = 0; i < types.length; i++) {
imports[i] = CacheConfigurations.getConfigurationClass(types[i]);
}
return imports;
}
}
}

这里有个ImportSelector,会获取缓存配置类的全类名,然后会根据全类名将配置类加入到ioc容器中。

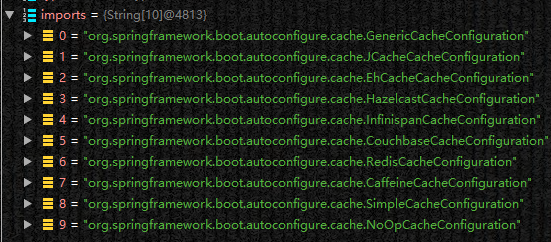
其中默认生效的是SimpleCacheConfiguration(在配置文件中加入debug: true,就可以看到自动装配了哪些类)

SimpleCacheConfiguration

1
2
3
4
5
6
7
8
9
10
11
12
13
14
15
16
17
18
19
20
21
22
23
24
25
@Configuration
@ConditionalOnMissingBean(CacheManager.class)
@Conditional(CacheCondition.class)
class SimpleCacheConfiguration {

private final CacheProperties cacheProperties;

private final CacheManagerCustomizers customizerInvoker;

SimpleCacheConfiguration(CacheProperties cacheProperties,
CacheManagerCustomizers customizerInvoker) {
this.cacheProperties = cacheProperties;
this.customizerInvoker = customizerInvoker;
}

@Bean
public ConcurrentMapCacheManager cacheManager() {
ConcurrentMapCacheManager cacheManager = new ConcurrentMapCacheManager();
List<String> cacheNames = this.cacheProperties.getCacheNames();
if (!cacheNames.isEmpty()) {
cacheManager.setCacheNames(cacheNames);
}
return this.customizerInvoker.customize(cacheManager);
}
}

其中注入了一个ConcurrentMapCacheManager

ConcurrentMapCacheManager

1
2
3
4
5
6
7
8
9
10
11
12
13
14
15
public class ConcurrentMapCacheManager implements CacheManager, BeanClassLoaderAware {
public Cache getCache(String name) {
Cache cache = this.cacheMap.get(name);
if (cache == null && this.dynamic) {
synchronized (this.cacheMap) {
cache = this.cacheMap.get(name);
if (cache == null) {
cache = createConcurrentMapCache(name);
this.cacheMap.put(name, cache);
}
}
}
return cache;
}
}

createConcurrentMapCache方法返回的是一个ConcurrentMapCache,这就是保存缓存数据的map

1
2
3
4
5
protected Cache createConcurrentMapCache(String name) {
SerializationDelegate actualSerialization = (isStoreByValue() ? this.serialization : null);
return new ConcurrentMapCache(name, new ConcurrentHashMap<>(256),
isAllowNullValues(), actualSerialization);
}
1
2
3
4
5
6
7
8
public class ConcurrentMapCache extends AbstractValueAdaptingCache{
private final String name;

private final ConcurrentMap<Object, Object> store;

@Nullable
private final SerializationDelegate serialization;
}

ConcurrentMapCache

1
2
3
4
5
6
7
8
9
10
11
12
13
14
15
16
17
18
19
20
21
22
23
24
25
26
27
28
29
30
31
32
33
34
35
36
37
38
39
40
41
42
43
44
45
46
47
public class ConcurrentMapCache extends AbstractValueAdaptingCache {

private final String name;

private final ConcurrentMap<Object, Object> store;


@Override
public final String getName() {
return this.name;
}

@Override
protected Object lookup(Object key) {
return this.store.get(key);
}

@SuppressWarnings("unchecked")
@Override
@Nullable
public <T> T get(Object key, Callable<T> valueLoader) {
return (T) fromStoreValue(this.store.computeIfAbsent(key, r -> {
try {
return toStoreValue(valueLoader.call());
}
catch (Throwable ex) {
throw new ValueRetrievalException(key, valueLoader, ex);
}
}));
}

@Override
public void put(Object key, @Nullable Object value) {
this.store.put(key, toStoreValue(value));
}

@Override
public void evict(Object key) {
this.store.remove(key);
}

@Override
public void clear() {
this.store.clear();
}

}

总结

首先,要使用缓存,就需要加入spring-boot-starter-cache这个启动器,并且使用@EnableCaching注解来开启缓存(注入必要的组件),而且默认是使用的SimpleCacheConfiguration这个配置类,其中会注册ConcurrentMapCacheManager这个CacheManager来管理缓存,ConcurrentMapCache就是默认的缓存容器。


------ 已触及底线感谢您的阅读 ------
麻辣香锅不要辣 微信支付

微信支付

  • 本文作者: 麻辣香锅不要辣
  • 本文链接: https://http://ybhub.gitee.io/2019/08/21/springboot-cache/
  • 版权声明: 本博客所有文章除特别声明外,均采用 BY-NC-SA 许可协议。转载请注明出处!
# SpringBoot # Cache
springboot启动配置原理
springboot-redis
  • 文章目录
  • 站点概览
麻辣香锅不要辣

麻辣香锅不要辣

21 日志
11 分类
20 标签
GitHub 简书
  1. 1. 环境搭建
  2. 2. 使用默认的cache(ConcurrentMapCache)
    1. 2.1. 在启动类中添加@EnableCaching注解开启缓存
    2. 2.2. 使用@Cacheable, @CacheEvict,@CachePut,@Caching等注解
      1. 2.2.1. @Cacheable
        1. 2.2.1.1. 运行流程(@Cacheable):
      2. 2.2.2. @CachePut
        1. 2.2.2.1. 运行流程
      3. 2.2.3. @CacheEvict
        1. 2.2.3.1. 运行流程
      4. 2.2.4. @Caching
  3. 3. 源码分析
    1. 3.1. SimpleCacheConfiguration
    2. 3.2. ConcurrentMapCacheManager
  4. 4. 总结
© 2019 – 2020 麻辣香锅不要辣 | 站点总字数: 20.4k字
|
0%