基本原理
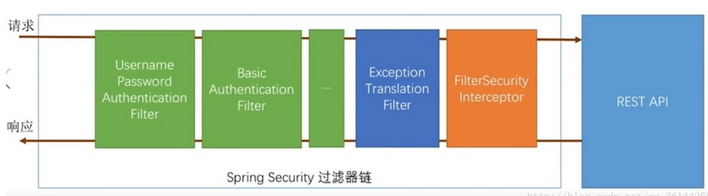
SpringSecurity 最核心的东西 其实是一个过滤器链,一组Filter
所有发送的请求都会经过Filter链,同样响应也会经过Filter链,在系统启动的时候springboot会自动的把他们配置进去
代码
启动器
1 | <dependency> |
自定义配置类
1 |
|
MyDeniedHandler
1 |
|
MyEntryPoint
1 |
|
MySuccessHandler
1 |
|
MyFailureHandler
1 |
|
MyProvider
1 |
|
MyUserDetailService
1 |
|
权限判断过程分析
- 用户发送请求。
- 调用UsernamePasswordAuthenticationFilter中的doFilter(父类AbstractAuthenticationProcessing中的doFilter)
- 调用ExceptionTranslationFilter中的doFilter
- 调用FilterSecurityInterceptor中的doFilter
- 调用doFilter中的invoke
- invoke中的beforeInvocation
- 从security容器中获取authentication
- 判断authentication是否具有权限
- 有:继续执行fi.getChain().doFilter(fi.getRequest(), fi.getResponse());
- 没有:
- 没有登录:调用authenticationEntryPoint的commence方法,默认是DelegatingAuthenticationEntryPoint,会重定向到默认的login页面。登录时:
- 调用UsernamePasswordAuthenticationFilter中的attemptAuthentication,获取username和password,获取一个AuthenticationManager,并调用其中的authentication方法(其实就是遍历AuthenticatinProvider,并调用其中的authentication方法),在方法中判断用户名和密码是否正确。
- 正确:调用successHandler中的onAuthenticationSuccess
- 错误:调用failureHandler的onAuthenticationFailure方法
- 调用UsernamePasswordAuthenticationFilter中的attemptAuthentication,获取username和password,获取一个AuthenticationManager,并调用其中的authentication方法(其实就是遍历AuthenticatinProvider,并调用其中的authentication方法),在方法中判断用户名和密码是否正确。
- 权限不足:调用AccessDeniedHandler中的handle方法,默认是AccessDeniedHandlerImpl,会转发到errorPage。
- 没有登录:调用authenticationEntryPoint的commence方法,默认是DelegatingAuthenticationEntryPoint,会重定向到默认的login页面。登录时:
- invoke中的beforeInvocation
- 调用doFilter中的invoke
权限判断过程源码
AbstractAuthenticationProcessingFilter
1 | public void doFilter(ServletRequest req, ServletResponse res, FilterChain chain) |
调用chain.doFilter(),然后调用ExceptionTranslationFilter中的doFilter
ExceptionTranslationFilter
1 | public void doFilter(ServletRequest req, ServletResponse res, FilterChain chain) |
FilterSecurityInterceptor
1 | public void doFilter(ServletRequest request, ServletResponse response, |
这里有个重要的方法
1 | InterceptorStatusToken token = super.beforeInvocation(fi); |
这个方法是用来判断是否具有权限的地方;如果有权限的话,就会返回一个token,并执行下面的doFilter方法,也就是业务代码;
如果没有权限的话,就是抛出一个异常。此异常会在ExceptionTranslationFilter中被捕获,并执行 handleSpringSecurityException(request, response, chain, ase)方法
1 | private void handleSpringSecurityException(HttpServletRequest request, |
这里首先会判断一下异常的类型:
- 如果是AuthenticationException异常的话就会调用sendStartAuthentication方法,
这个方法中会调用authenticationEntryPoint.commence(request, response, reason);这个authenticationEntryPoint可以自定义,默认是DelegatingAuthenticationEntryPoint,
其中的commence方法会自动redirect到登陆页面。 - 如果是AccessDeniedException异常的话,会先在security容器中取出认证信息(即当前用户信息):
- 如果是匿名用户(即没有登录),就调用sendStartAuthentication方法,重定向到登录界面。
- 如果不是匿名用户,则说明是权限不足,就会调用accessDeniedHandler中的handle方法。默认使用的是AccessDeniedHandlerImpl。会转发到errorPage,
可以自定义。
如果是没有登录,跳转到了登录页面的话(可以自定义登录页面,给前端返回json数据,前端发送ajax请求的地址是设置的loginProcessUrl(默认是/login,可以自定义))
当前端提交了用户名和密码之后,会调用attemptAuthentication方法
1 | try { |
attemptAuthentication方法是在UsernamePasswordAuthenticationFilter中实现。
UsernamePasswordAuthenticationFilter
1 | public Authentication attemptAuthentication(HttpServletRequest request, |
这里会获取request中的username和password(默认的表单中的name也是username和password,可以自定义,在configure中设置usernameParamter)
1 | public static final String SPRING_SECURITY_FORM_USERNAME_KEY = "username"; |
然后就会获取一个AuthenticationManager,并调用其中的authenticate方法。
1 | for (AuthenticationProvider provider : getProviders()) { |
其实就是遍历AuthenticationProvier,并调用其中的authenticate方法,provider可以我们自定义。
1 |
|
这里就是认证用户的地方,校验用户名密码,获取权限。其中的UserDetails就是封装
用户信息的一个类,通过UserDetailsService.loadUserByUsername方法获取。UserDetailsService是一个接口,需要自定义实现类
MyUserDetailService
1 |
|
这里就是更具用户名从数据库中获取密码和权限。
然后在provider中进行校验密码。如果密码错误,或者用户名不存在,就抛出特定的异常。
异常会在AbstractAuthenticationProcessingFilter中捕获(AbstractAuthenticationProcessingFilter->UsernamePasswordAuthenticationFilter
->MyProvider)
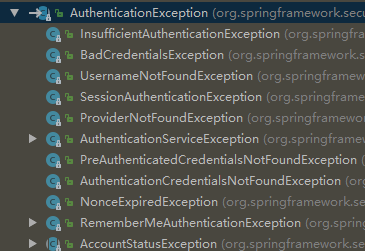
1 | catch (InternalAuthenticationServiceException failed) { |
spring security给我们准备了很多的异常。如下图
如果抛出了用户名和密码的异常,就会调用AbstractAuthenticationProcessingFilter中的unsuccessfulAuthentication(request, response, failed);
最后会调用failureHandler的onAuthenticationFailure方法。
默认使用SimpleUrlAuthenticationFailureHandler,这个failureHandler可自定义。
1 |
|
如果用户名和密码没有问题,就会返回一个Authentication,然后调用successHandler中的onAuthenticationSuccess
默认使用SavedRequestAwareAuthenticationSuccessHandler,可以自定义
1 |
|
登录后,用户认证信息就是保存在security容器中,当再次访问时,就会判断权限是否足够。